

Quiet country lanes, dusty tracks, and a little curiosity - your Focus Atlas is ready to help you discover another side of Mallorca.
Before you head out, here’s a simple guide to your rental bike: what’s included, how the gears work, how to charge the battery, and what to do if a tyre loses air. Keep it handy throughout your rental.
⚡ Quick Answers - Find What You Need
🎒 What’s included with my bike?
⚙️ How do I use the electronic gears?
🔋 How do I check and charge the battery?
🧴 How do I care for the waxed chain?
🛞 What should I do if I get a puncture?
🌿 Any tips for riding on gravel?
🆘 Something isn’t working. What now?
1. What’s Included with Your Bike?
Your gravel bike comes with a few essentials to help you enjoy the ride:
- A tool bag stored inside the frame, in a compartment beneath the bottle cage. It contains a spare inner tube, a tyre plug, a multitool, and tyre levers.
- A mini pump mounted on the frame.
- Transparent protective film on the frame to help protect it from everyday scratches.
The tool bag sits securely inside its compartment, keeping your repair essentials tucked away while you ride.
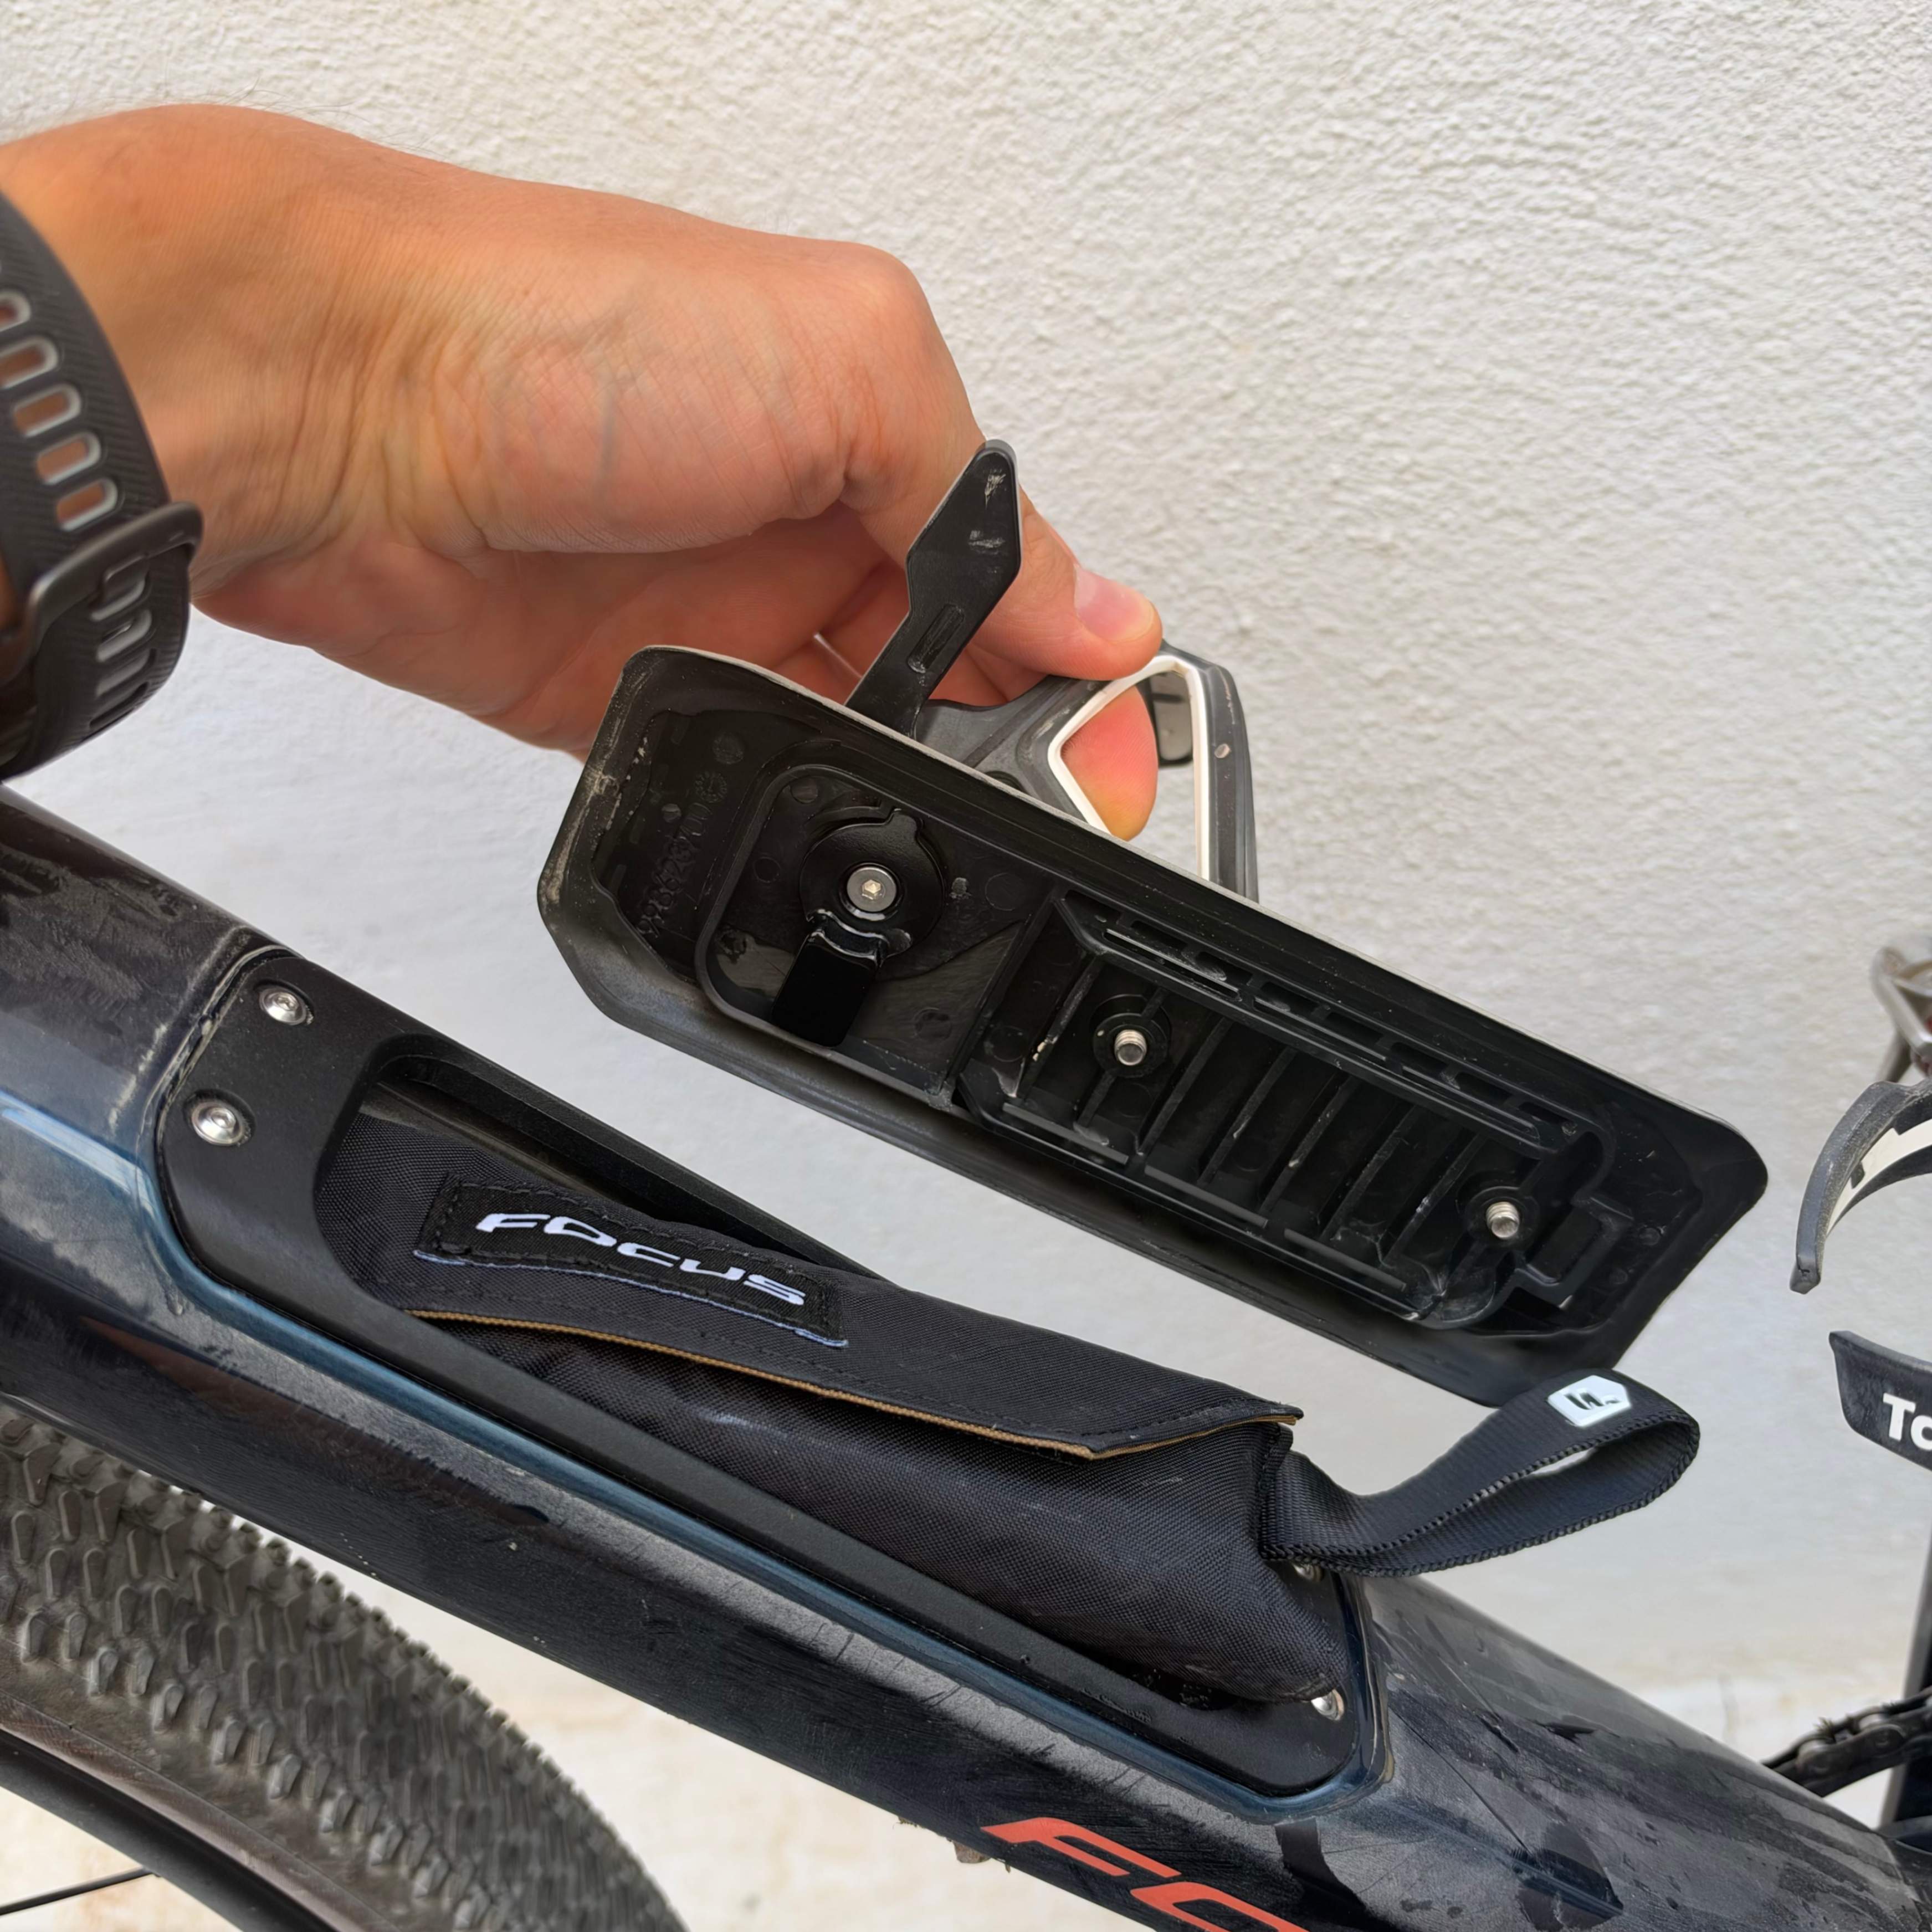
For rentals longer than two days, we also provide the charging equipment for your electronic gears and a small bottle of wax lubricant.
Before setting off, locate the pump and practise accessing the tool bag using the method shown during handover. After checking the contents, secure the bag and close the compartment properly.
Why is there a spare tube if the tyres are tubeless? It’s your backup if a puncture cannot be sealed. More on that below.
2. How to Use Electronic Shifting
Your Focus Atlas uses SRAM Apex AXS electronic shifting. The buttons on the handlebars send a wireless signal to the rear derailleur - the mechanism that moves the chain between gears.
There’s one chainring at the front, so you only need to think about choosing an easier or harder gear.
Which button does what?
With the standard SRAM control setup:
- Left paddle → easier gear. Useful for climbs, loose surfaces, and getting moving.
- Right paddle → harder gear. Useful when you pick up speed on flatter ground or descents.
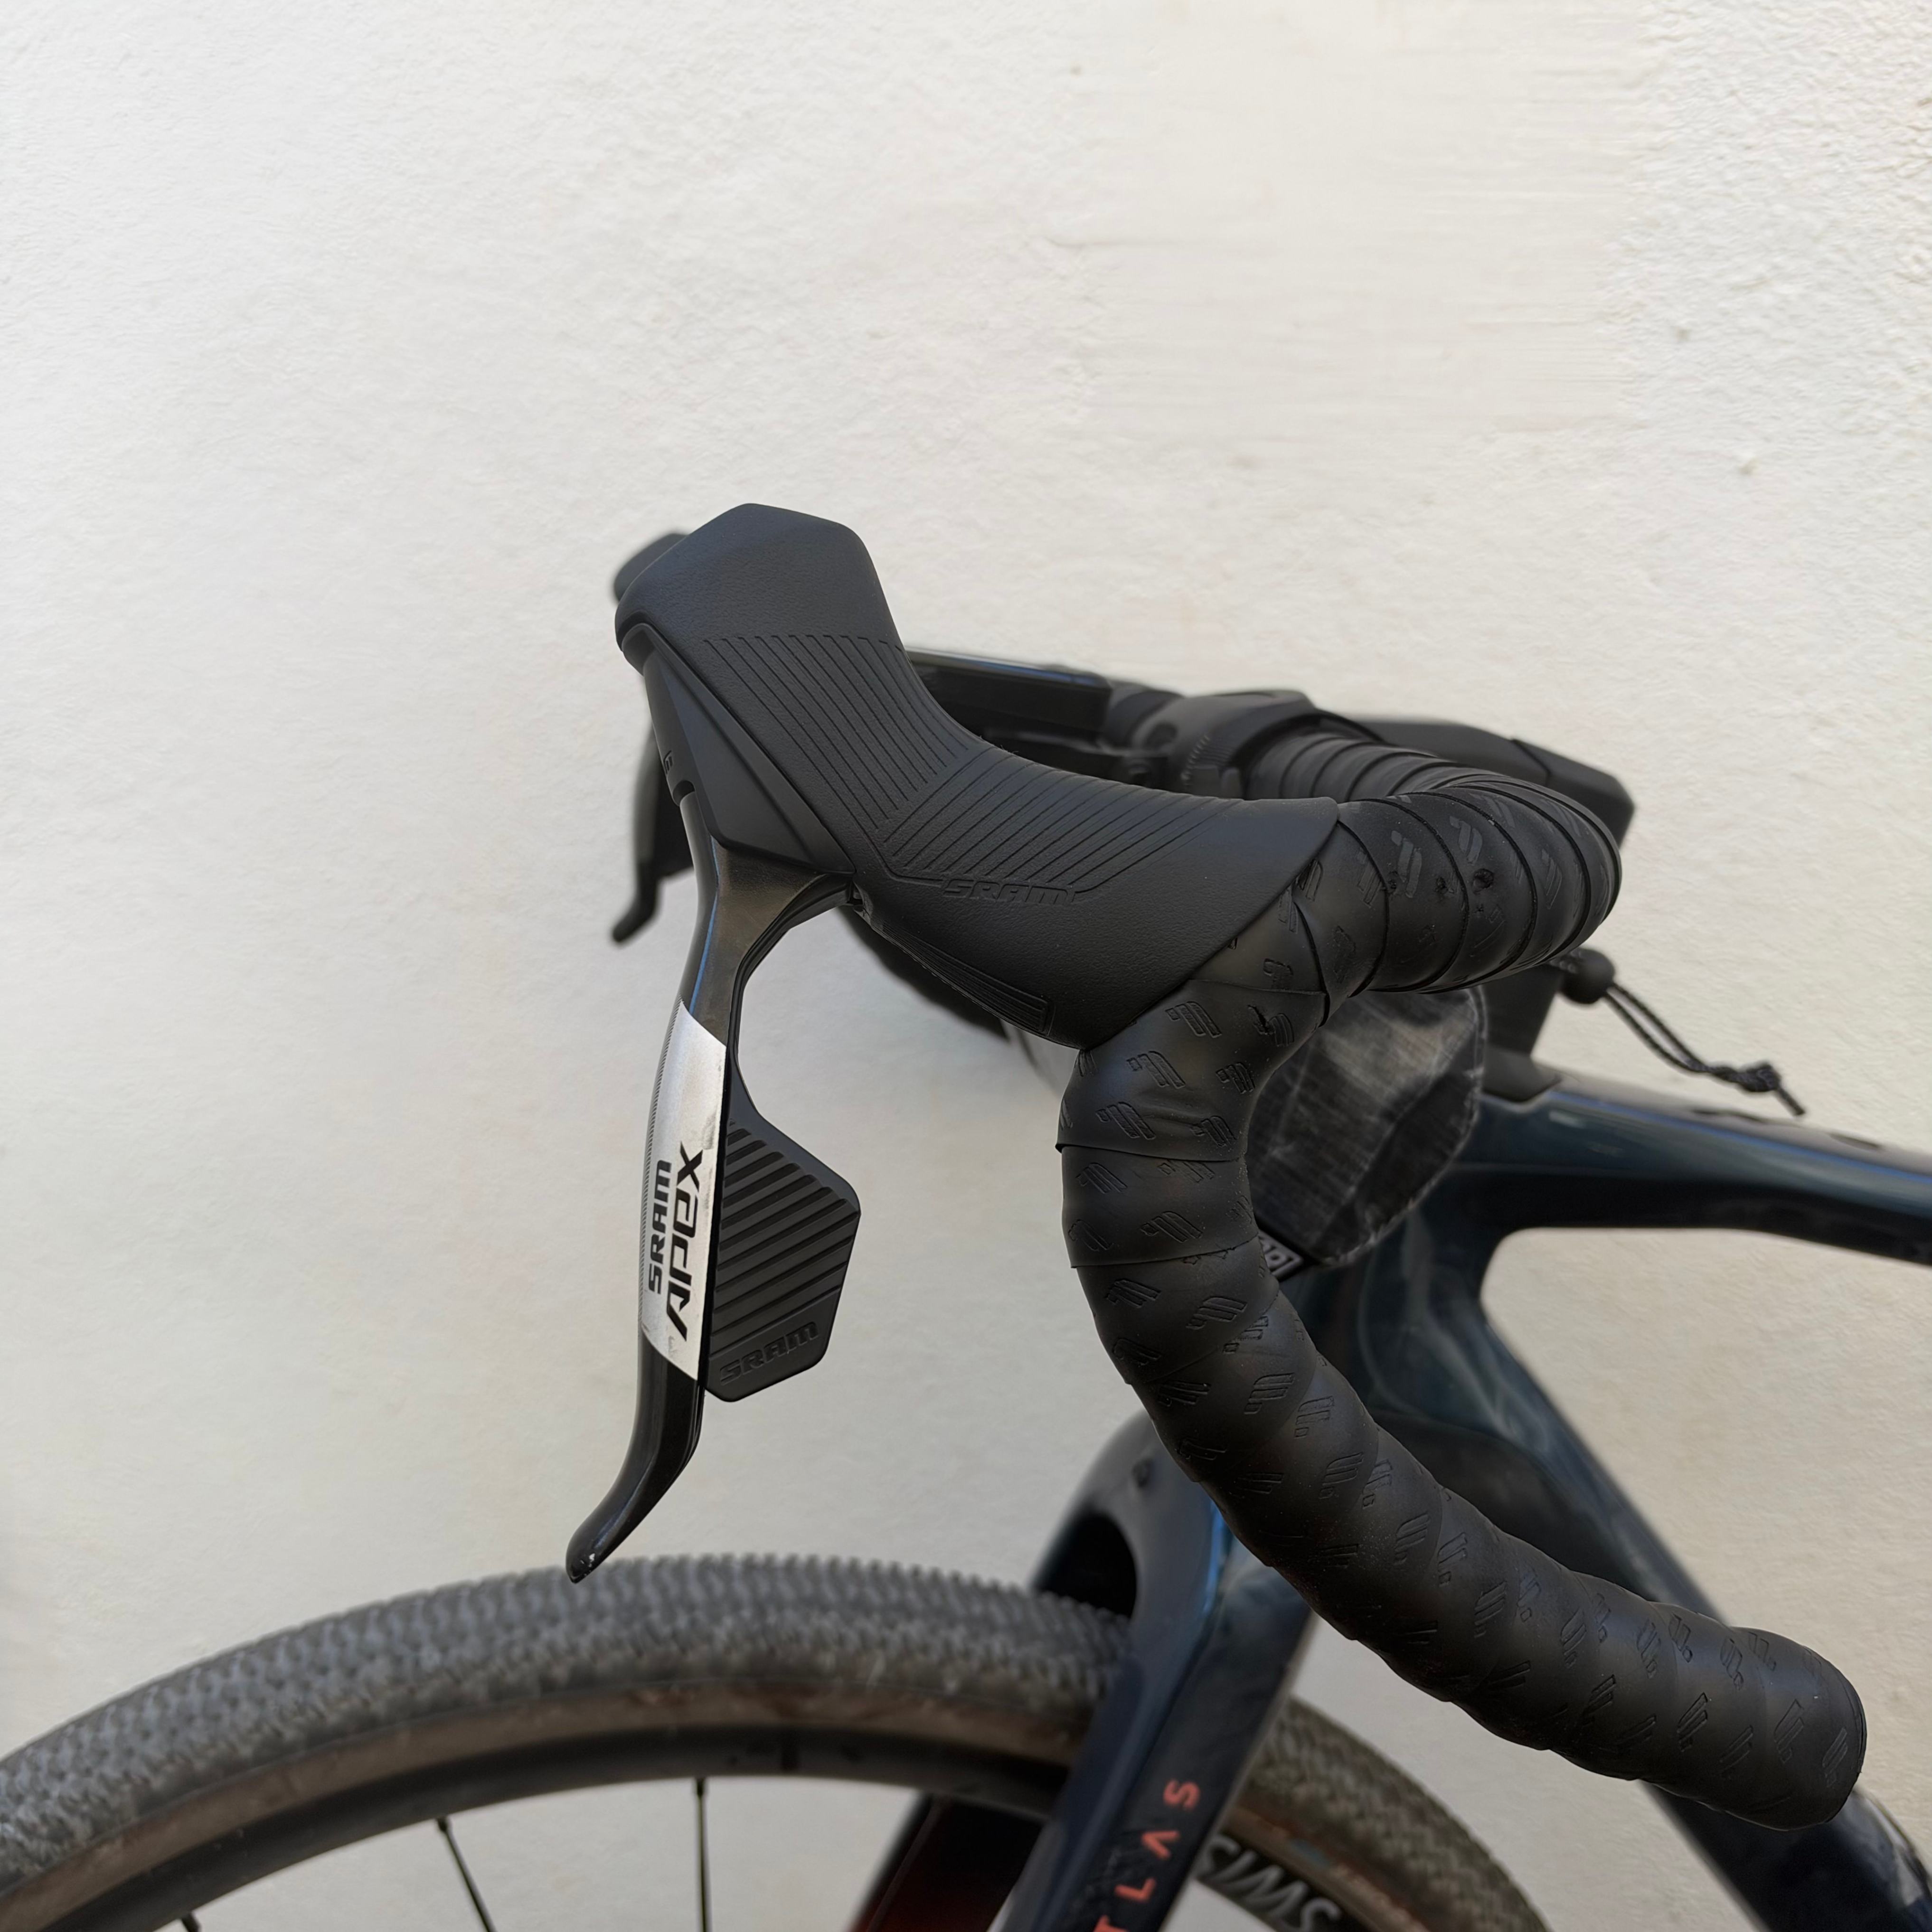
The shift paddles sit behind the brake levers. A short press changes one gear. You do not need to shift a front chainring. SRAM shifting guide
A small habit that makes a big difference
Keep pedalling as you change gear, but briefly ease the pressure on the pedals.
On a climb, shift into an easier gear before pedalling becomes difficult. On loose gravel, smooth pedalling also helps the rear tyre keep its grip.
Try both shift paddles somewhere quiet before your first ride. A few changes are usually enough to make the controls feel natural.
3. How to Charge Your Electronic Shifting
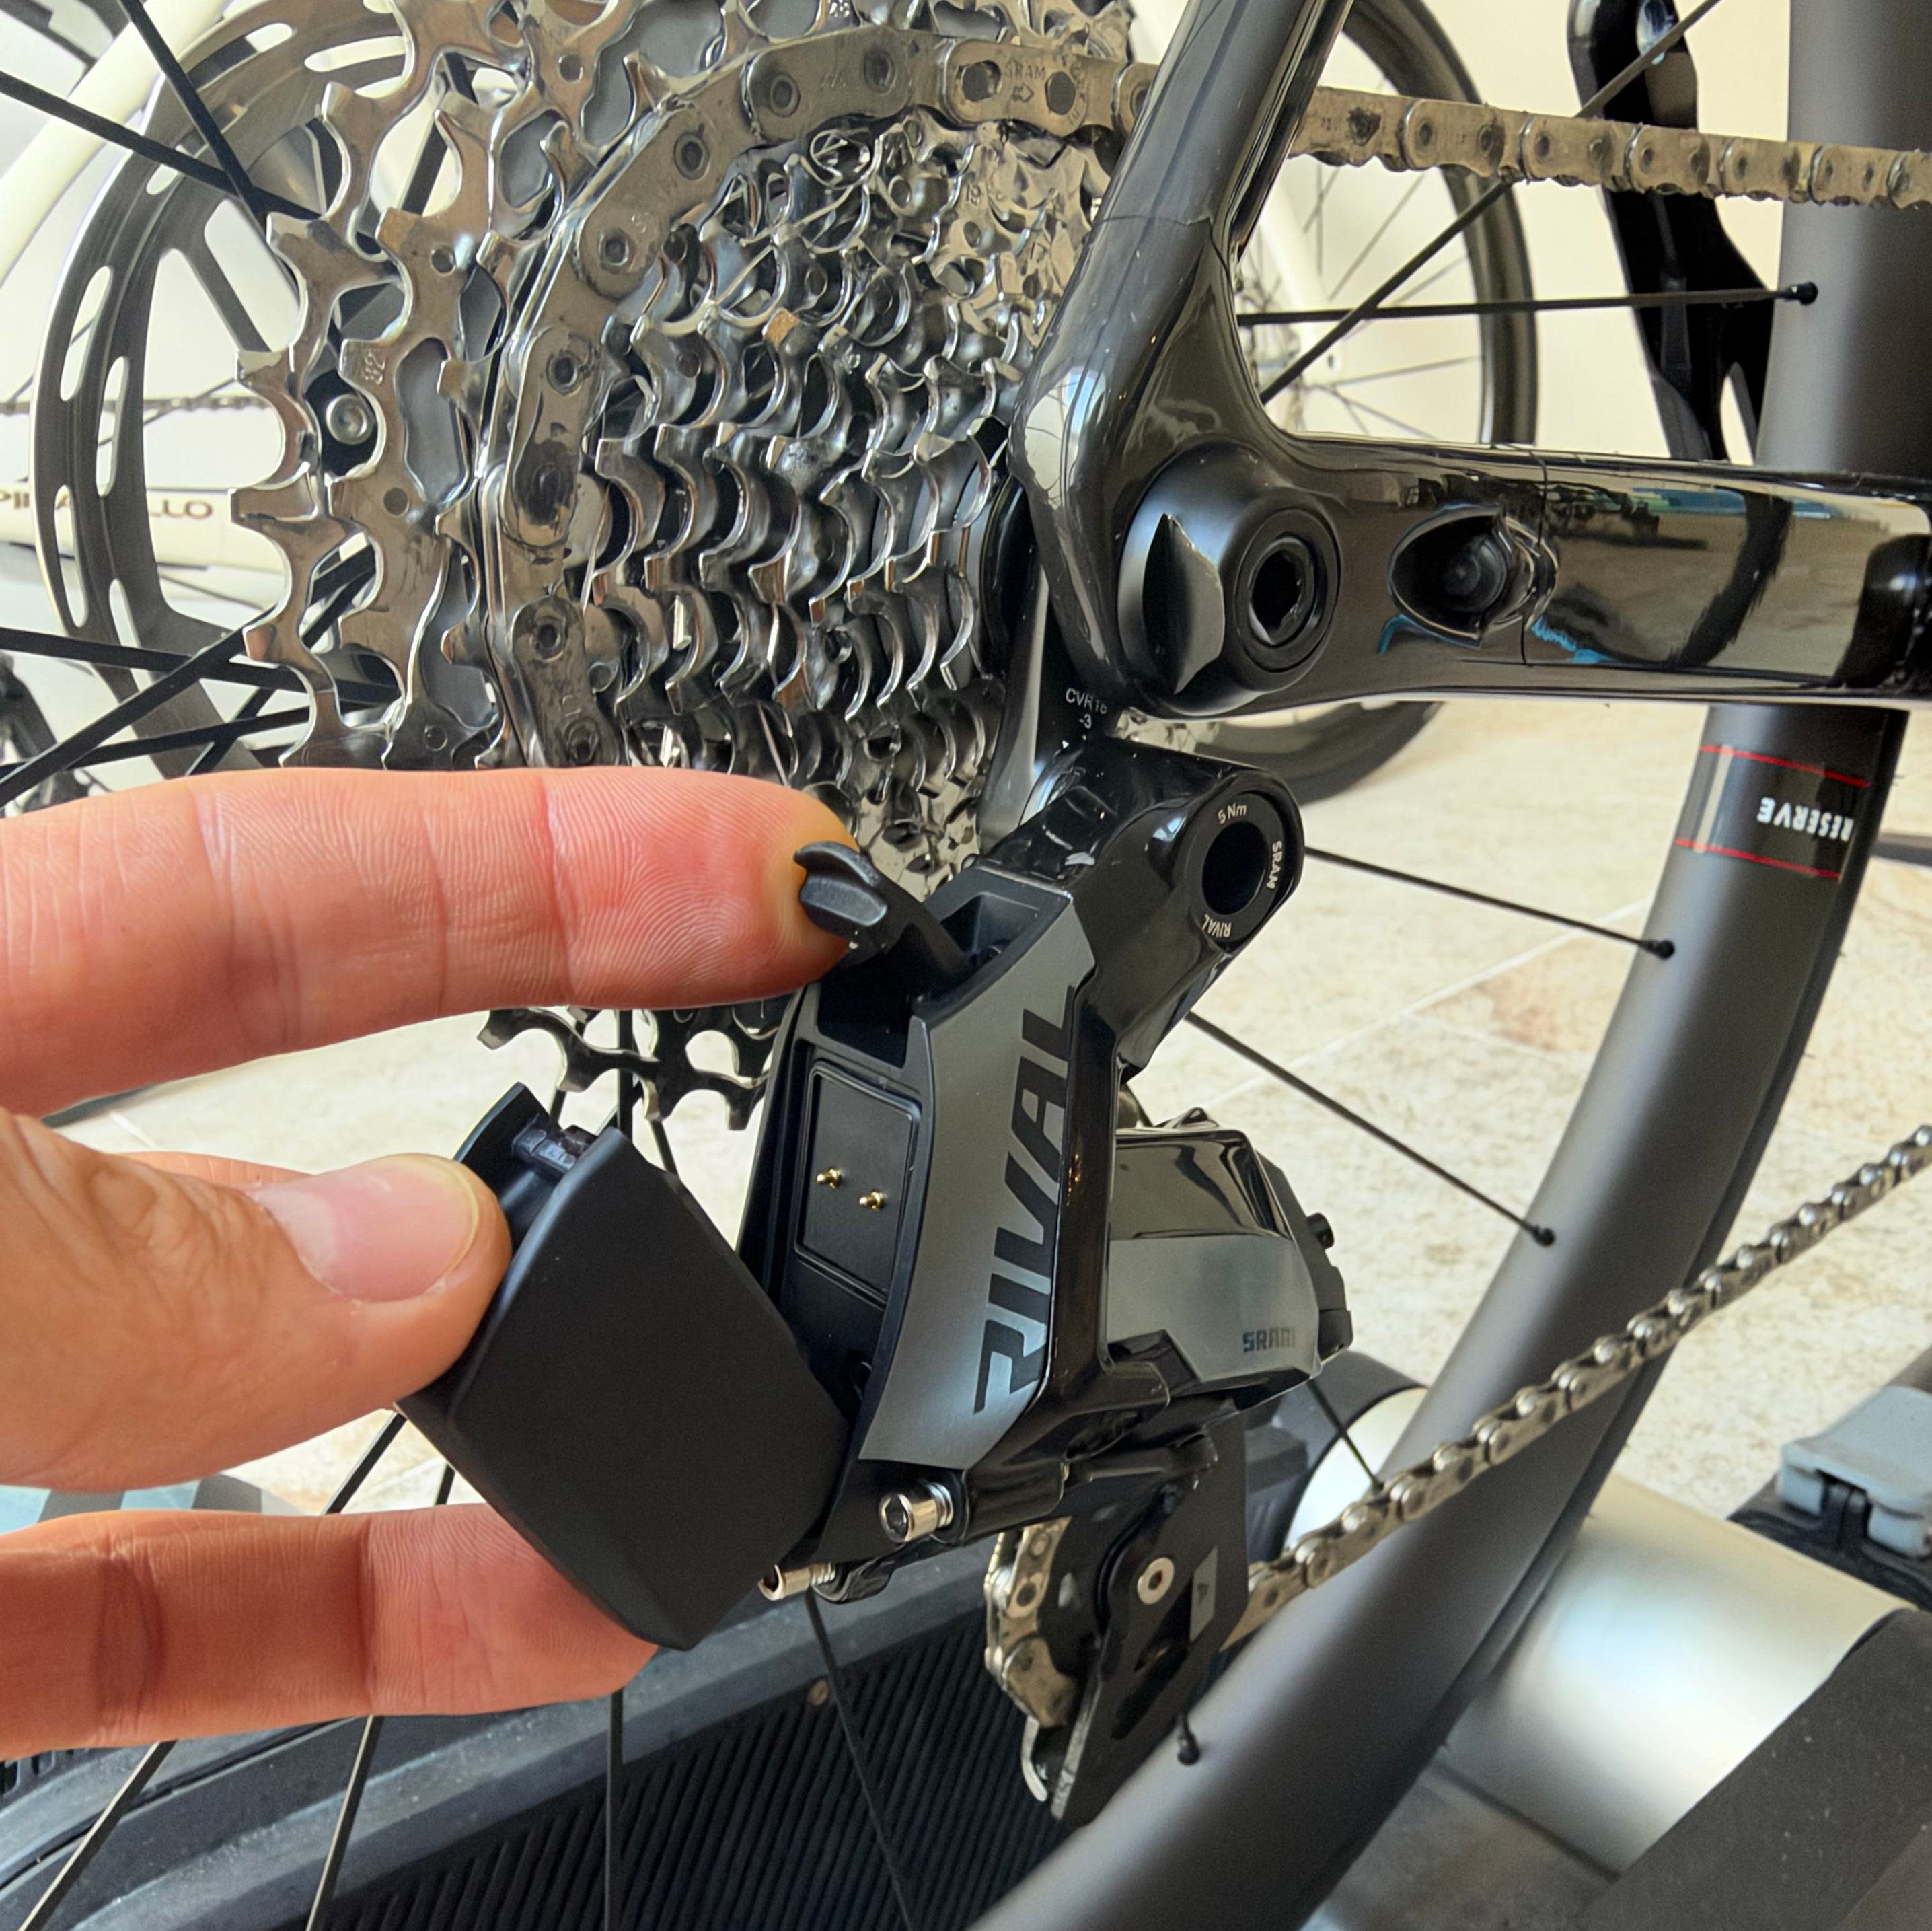
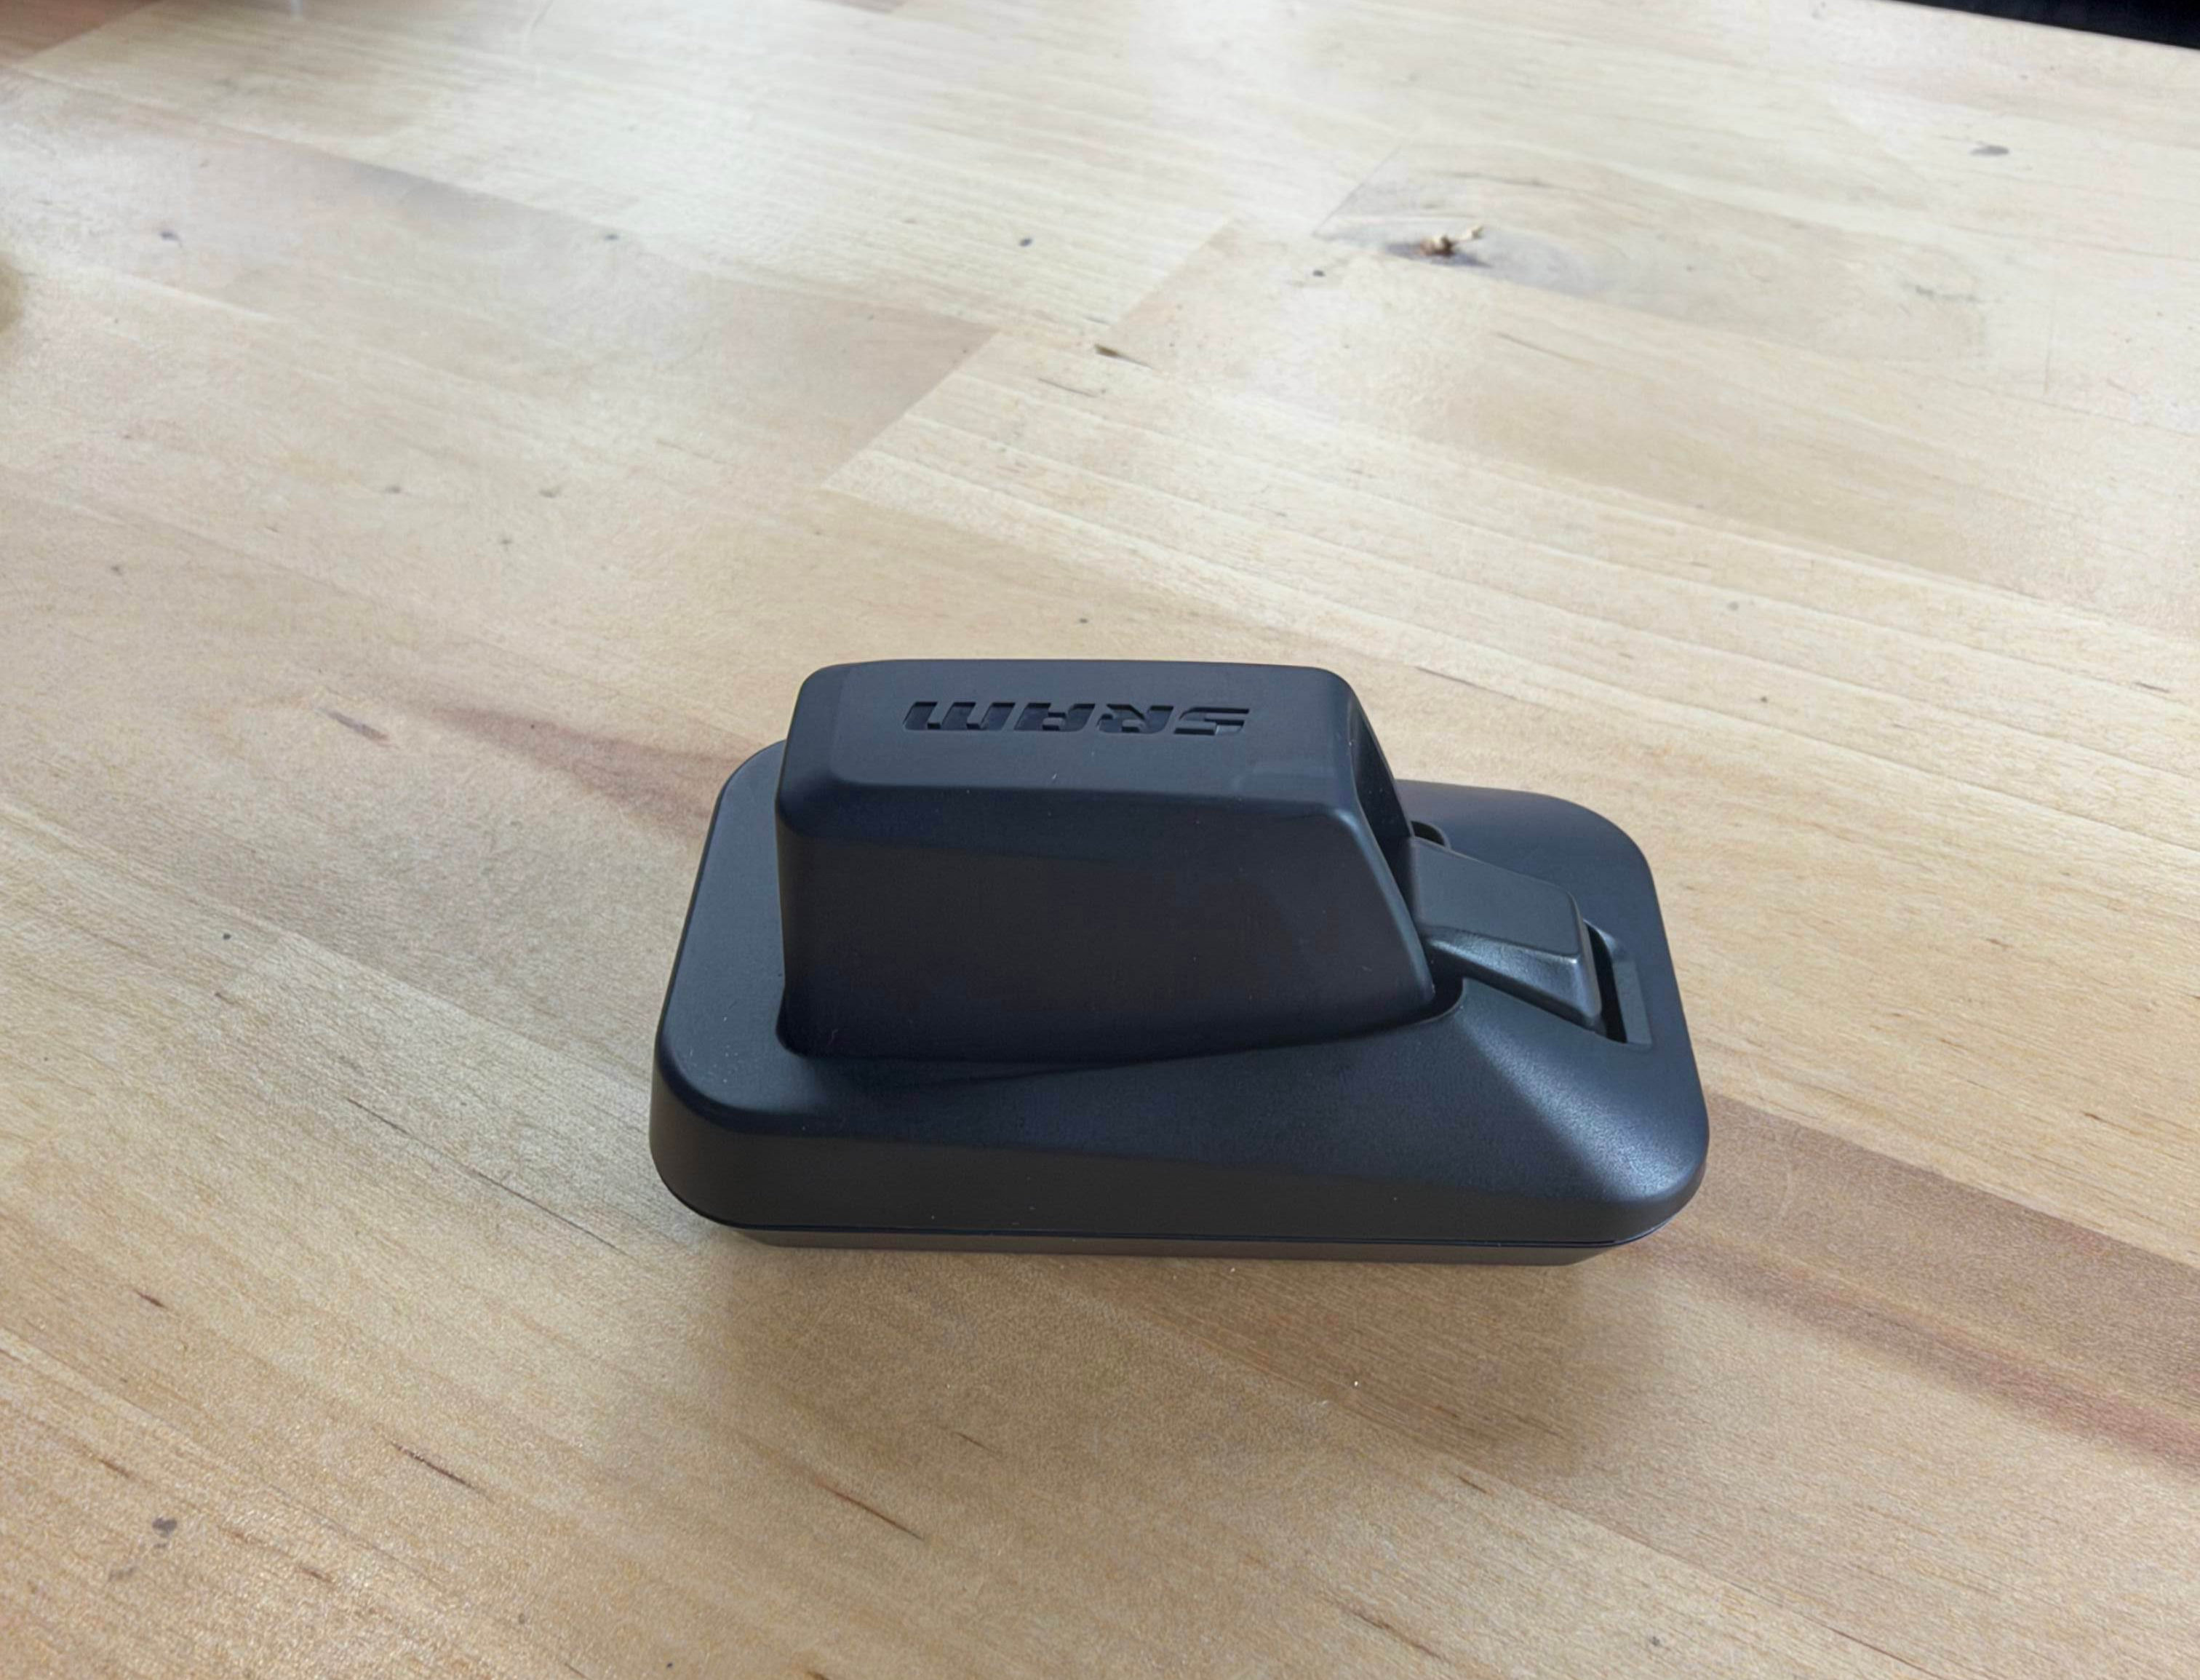
The rechargeable battery is attached to the rear derailleur, near the back wheel. You remove it from the bike and place it in the SRAM charging cradle.
Check the battery status
Briefly press and release the small AXS button on the rear derailleur. Look at the indicator light:
- Green - Good battery level
- Red - Low battery, charge it before your next ride
- Flashing red - Critically low, charge it now
A brief press is enough. Holding the button starts a different function. SRAM battery-status instructions
Charge the battery step by step
- Make sure your hands and the area around the battery are clean and dry.
- Open the battery latch and carefully remove the battery.
- Place the battery into the supplied SRAM charging cradle.
- Connect the cradle to a suitable USB power source using the supplied cable.
- Wait for the charging light to turn green. On the standard SRAM cradle, yellow means charging.
- Remove the battery from the cradle, reinstall it on the derailleur, and close the latch securely.
The battery normally takes about one hour to charge fully. Before riding, check that it is secure and test the shifting while gently pedalling. SRAM charging instructions, SRAM charging-time guidance
Do the handlebar controls need charging too?
Each shifter has its own small coin-cell battery. These are separate from the rechargeable derailleur battery and do not go into the charging cradle.
If one paddle stops responding, contact us so we can help identify the cause. SRAM troubleshooting guide
4. Your Chain Is Waxed - Here’s Why It Matters
We prepare our gravel bikes with waxed chains. Wax lubricates the chain without the oily coating that tends to collect dirt.
Please do not add chain oil or general-purpose lubricants. Use only the wax lubricant supplied by Echelon.
How to top up the wax
If the chain needs a top-up during your rental:
- Wipe off surface dust with a clean, dry cloth.
- Make sure the chain is dry.
- Shake the supplied wax bottle.
- Apply it to the chain rollers as shown during handover, keeping your fingers clear of the moving drivetrain.
- Leave it to dry for the time stated on the bottle.
The evening before your next ride is usually the best time to apply wax. It gives the lubricant time to dry properly. Follow the supplied product’s instructions; drying time varies between wax formulas. SILCA wax application guidance

Gravel rides can leave more dust on the chain than road rides. If it becomes noisy, gets very muddy, or needs attention after a wet ride, contact us for advice.
Keep all lubricant away from the brake discs and pads.
5. Tyres, Tubeless, and Punctures
Your Focus Atlas is fitted with 45 mm Schwalbe G-One R Pro tyres, set up tubeless.

That means there is no inner tube inside during normal use. Instead, liquid sealant inside the tyre helps seal small punctures.
What does that mean for your ride?
Tubeless tyres provide comfort and grip on uneven surfaces, and the sealant can take care of small holes without a tube change.
They are still capable of getting punctures. Larger cuts and damage may need a repair or assistance.
What tyre pressure should I use?
Use the pressure recommended by our team for your weight, luggage, and planned route.
These wider gravel tyres use different pressures from narrow road tyres. Avoid inflating them to your usual road-bike pressure or letting air out at random.
Check the tyres before each ride.
If you hear air escaping or see sealant
- Slow down and stop somewhere safe.
- If you can locate the puncture, turn the wheel so the damaged area is at the bottom. This helps the sealant reach it.
- Give the sealant a moment to work.
- If the leak stops, use your pump to restore the recommended pressure.
- Check that the tyre holds air before continuing.
Do not ride on a flat tyre or one that continues losing pressure.
If the puncture will not seal
Contact us if the tyre has a large cut, will not hold air, or you are unsure what to do.
The spare inner tube can be used as a backup when the tyre is otherwise safe to use. Fitting it requires removing the tubeless valve and checking the tyre for anything that could puncture the tube. If you are unfamiliar with the process, let us guide you.
6. Tips for a Better Gravel Ride
Gravel riding is about finding a comfortable rhythm and enjoying where the route takes you. A few small adjustments can make the bike feel more predictable.
Keep your movements smooth
Brake progressively, steer gently, and avoid sudden changes of direction on loose surfaces. Reduce your speed before a corner.
Shift early on climbs
Choose an easier gear before the slope gets steep. Stay seated where practical and pedal smoothly to help the rear wheel maintain traction.
Look ahead
Watch for loose stones, sand, potholes, and changes in the surface. Give yourself time to choose a clear line.
Choose a route that suits you
A track on a map may be rougher than expected. If a section feels beyond your ability, get off and walk. Ask our team if you would like help choosing a suitable route.
Leave room for the essentials
Take water, something to eat, and a charged phone. Download your route before leaving if you plan to explore areas with limited reception.
Respect signs, private property, walkers, and other trail users. Slow down when passing people and give them plenty of space.
7. Troubleshooting and Support
The gears are not responding
Move the bike slightly to wake the system, then check the derailleur battery indicator. Make sure the battery is correctly installed and the latch is closed.
If the battery is low, charge it. If the problem continues - or only one paddle works - contact us. SRAM troubleshooting guide
The chain sounds dry or noisy
Check for visible dirt and follow the wax-care instructions above. Do not add oil.
If the chain skips, shifting feels wrong, or the noise continues, contact us before trying to adjust the gears.
A tyre keeps losing air
Stop and check it. If it will not hold the recommended pressure, do not continue riding on it. Contact us for help.
Something feels loose, damaged, or unsafe
Stop riding. If the brakes feel wrong, a wheel is damaged, or the bike has taken a fall, contact us before continuing.
Need help? We're here.
Our team at Echelon Cycling Hub is happy to help with questions about your bicycle or equipment.
Phone: +34 623 156 763
Website: https://www.echeloncyclinghub.com
When contacting us about a technical issue, a photo or short video can help us understand the problem faster.
Ready to Ride?
Your bike has been professionally prepared, checked and equipped for your Mallorca adventure.
We hope this guide gives you everything you need to ride with confidence.
Now it's time for the best part: discovering Mallorca on two wheels.
Not just cycling. A way to explore.
The Echelon Cycling Hub Team


