

Welcome to Mallorca! Your road bike is ready, the mountains are waiting, and there's only one thing left to do: enjoy the ride.
Whether you're exploring the coastline, climbing Sa Calobra, or heading out for your morning coffee ride, we want your time on the bike to be smooth and worry-free.
This guide explains what's included with your Echelon road bike, how to use and charge electronic shifting, and how to take care of your bike during the rental.
1. What's Included with Your Bike?
Every Echelon road bike comes prepared for your adventure. We've taken care of the essentials, so you can focus on riding.
Your saddle bag contains:
- Spare inner tube: Your backup in case of a puncture.
- Tyre levers: Small tools to help remove a tyre from the rim.
- Multitool: Useful for minor adjustments during your ride.
You'll also find a mini pump mounted on the bike frame and bottle holders for your water bottles.
A little extra protection
Our rental bike frames are covered with transparent protective film. It helps protect the paint from everyday scratches and scuffs.
You may notice the film around areas of the frame that receive the most contact. It's there for a reason, so please leave it in place.
The film helps prevent cosmetic wear, but it cannot protect the bicycle from crash damage.
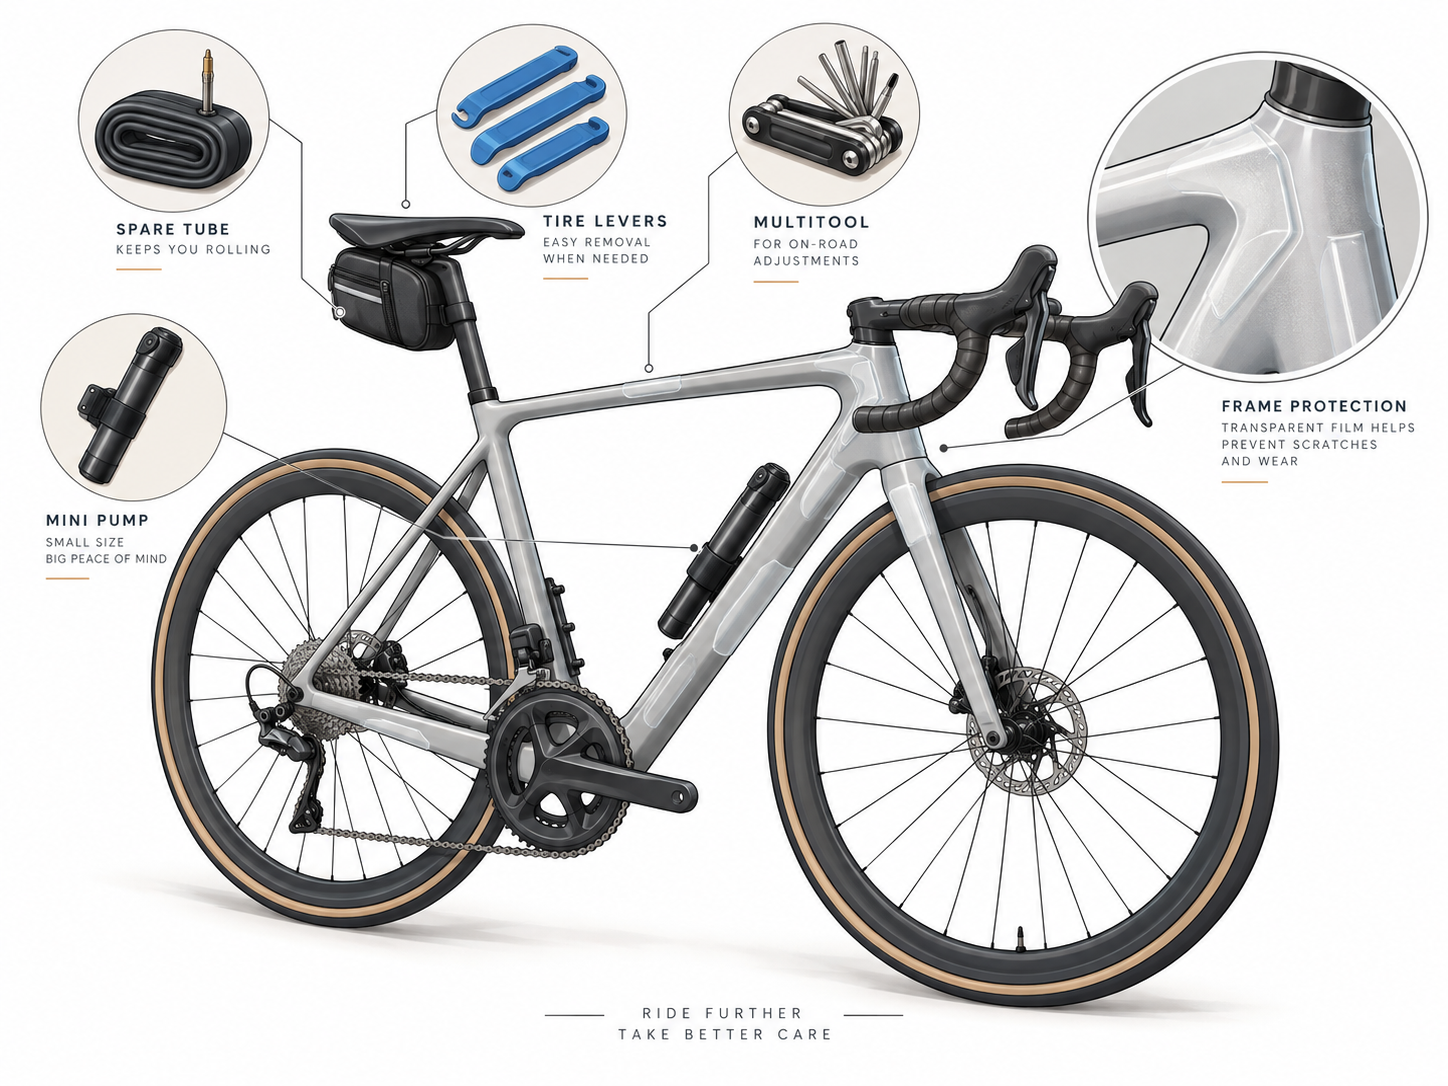
[Illustration 1: What's included with your Echelon road bike]
Your bike, your setup
We know every cyclist has personal preferences. That's why we can prepare your rental bike with your requested equipment, subject to availability.
This includes compatible Garmin, Wahoo or Hammerhead computer mounts, different pedal systems, and saddle options.
Please tell us your preferences before your rental so we can have everything ready when we deliver your bike.
[Illustration 2: Pedals, saddles and bike computer mounts]
2. How to Use Electronic Shifting
All our road bikes use electronic shifting. That means precise gear changes at the touch of a button.
Depending on your bicycle, you'll have either Shimano 105/Ultegra Di2 or SRAM Rival AXS.
Not sure which one you have? Look at the name printed on your rear derailleur, near the rear wheel.
Shimano Di2: How to shift
Shimano Di2 uses electronic buttons integrated into the brake levers.
With the standard setup:
- The right-hand shifter controls the rear gears.
- The left-hand shifter controls the front chainrings.
- Each shifter has buttons for changing gears in either direction.
The buttons are located behind the brake levers. You only need a light press to change gear.
Try shifting a few times before your first ride to become familiar with the controls. Pedal gently while changing gears.
SRAM Rival AXS: How to shift
SRAM uses a different, very intuitive shifting system.
- Left paddle: Shift to an easier rear gear, ideal for climbing.
- Right paddle: Shift to a harder rear gear, ideal for riding faster.
- Both paddles together: Change the front chainring, if your bicycle has two chainrings.
Easy to remember: Left for easier, right for harder.
Our team will show you how your specific bike is configured during the handover.
3. How to Charge Your Electronic Shifting
Electronic shifting runs on batteries, but don't worry. We charge and check your bike before every rental.
For rentals longer than two days, we also provide the appropriate charging equipment.
We recommend checking the battery before a long ride, especially if you're planning a big day in the mountains.
Shimano Di2: Charging and battery status
On our road bikes equipped with the current 12-speed Shimano Di2 system, the charging port is located on the rear derailleur.
To charge:
- Find the charging port on the rear derailleur.
- Carefully open its protective cover.
- Connect the supplied Shimano charging cable.
- Connect the other end to a compatible USB power source.
- Wait until charging is complete, then disconnect the cable and close the cover.
You do not need to remove the battery from the bike.
To check battery status, briefly press the small function button on the rear derailleur and check its LED.
- Solid green 51-100%
- Flashing green 26-50%
- Solid red 1-25%
- No light - battery may be empty
If you see a red light, charge the battery before your next ride.
[Illustration 3: Shimano Di2 charging port and battery indicator]
SRAM Rival AXS: Charging and battery status
SRAM AXS uses removable batteries attached directly to the derailleurs.
To charge:
- Find the battery attached to the rear derailleur.
- Release its retaining latch and carefully remove it.
- Insert the battery into the supplied SRAM charger.
- Connect the charger to a suitable power source.
- Wait until the charger indicates that the battery is full.
- Reinstall the battery on the derailleur and close the latch securely.
If your bicycle has a front derailleur, it has a separate rechargeable battery.
A full SRAM AXS derailleur battery charge normally takes about one hour.
To check battery status, briefly press the AXS button on the derailleur.
- Green - more than 25%
- Red 10-25%
- Flashing red - less than 10%
A flashing red light means it's time to charge.
[Illustration 4: SRAM AXS removable battery and charger]
A useful tip: If your electronic shifting stops working, check the battery before assuming something is broken. A depleted battery is one possible cause.
4. Your Chain Is Waxed. Here's Why It Matters.
Here's something special about our road bikes: we use wax instead of traditional chain oil.
A waxed chain stays cleaner and attracts less dirt than a chain lubricated with conventional oil.
That means a quieter drivetrain, less grime on your hands, and fewer black chain marks on your socks.
How to maintain your waxed chain
For rentals longer than two days, we provide a small bottle of drip-on chain wax together with the charging equipment.
If your chain starts to sound dry, you can apply the supplied wax.
How to apply it:
- Wipe the chain to make it reasonably clean and dry.
- Apply a small amount of wax to each chain roller while slowly turning the pedals backward.
- Let the wax dry ideally overnight.
- Enjoy a smooth ride the next day.
It's best to apply the wax the evening before your next ride, not immediately before heading out.
Important: Do not apply traditional chain oil to your waxed chain. Oil can contaminate the wax coating and attract dirt.
Also, don't worry if your chain looks dry. A waxed chain does not need to look wet or oily to work correctly.
[Illustration 5: Applying wax and letting the chain dry overnight]
5. Tyres, Tubes and Punctures
Our road bikes come with standard inner tubes unless you've requested our optional tubeless setup.
Standard setup: Inner tubes
Inside each tyre is an inflatable rubber tube that holds the air.
If you get a puncture, you can use the spare tube, tyre levers and mini pump supplied with your bike.
If you're familiar with changing a tube, make sure you inspect the tyre for sharp objects before installing the replacement.
Always check that the tyre is seated correctly before inflating it.
Optional setup: Tubeless tyres
If you've requested our tubeless add-on, your tyres use sealant instead of inner tubes.
The sealant can close many small punctures automatically while you're riding.
If you notice a small puncture:
- Stop in a safe location.
- Allow the sealant to reach the puncture.
- Check whether the tyre is holding air.
- Add air with the mini pump if necessary.
If the puncture does not seal, you have a tyre plug in your saddle bag, otherwise contact us for guidance.
What tyre pressure should you use?
The correct tyre pressure depends on several factors, including your weight, tyre width and wheel setup.
We typically setup our road bikes with tubes at 70PSI.
If you're unsure, ask our team for the recommended pressure for your bike.
Never continue riding on a completely flat tyre. This can damage the wheel.
[Illustration 6: Inner tubes versus tubeless tyres]
6. A Few Tips for a Better Ride
A little preparation makes a big difference, especially when you're riding unfamiliar roads.
Before you leave:
- Check that both tyres have enough air.
- Test both brakes.
- Check your electronic shifting battery.
- Make sure your saddle bag, pump and bottles are secure.
- Confirm that your pedals and bike computer mount are fitted correctly.
While riding:
- Shift to an easier gear before a steep climb.
- Reduce pressure on the pedals briefly when changing gears under heavy load.
- Avoid changing gears while standing still.
- Take care on steep descents, especially when the road is wet.
- Never touch the brake rotors immediately after a long descent. They can become very hot.
And one more Mallorca-specific tip: bring enough water. Even outside summer, a long climb under the Mediterranean sun can be demanding.
7. Troubleshooting and Support
Even a perfectly prepared bike can develop a problem during a ride. If something doesn't feel right, stop in a safe place and check the situation.
My electronic gears stopped shifting
First, check the battery status using the instructions above.
If you're using SRAM AXS, check that the derailleur battery is correctly attached.
If the battery has charge but the gears still don't work, contact Echelon. Please don't attempt electronic derailleur adjustments or system resets without guidance.
My chain is making noise
A little drivetrain noise can happen, especially after several long rides or in dusty conditions.
If your waxed chain sounds dry, you can apply the supplied chain wax according to the instructions above.
If you hear loud clicking, grinding or repeated skipping, stop and contact us rather than continuing to ride.
I've had a puncture
Move to a safe place away from traffic.
If you're comfortable replacing an inner tube, you can use the equipment in your saddle bag.
If you're unsure what to do, or your wheel or tyre appears damaged, contact our team for assistance.
Something else doesn't feel right
Please contact us if you notice unusual brake behaviour, damage to the bike, loose components or anything that could affect your safety.
Avoid attempting major mechanical repairs yourself.
Need help? We're here.
Our team at Echelon Cycling Hub is happy to help with questions about your bicycle or equipment.
Phone: +34 623 156 763
Website: https://www.echeloncyclinghub.com
When contacting us about a technical issue, a photo or short video can help us understand the problem faster.
Ready to Ride?
Your bike has been professionally prepared, checked and equipped for your Mallorca adventure.
We hope this guide gives you everything you need to ride with confidence.
Now it's time for the best part: discovering Mallorca on two wheels.
Not just cycling. A way to explore.
The Echelon Cycling Hub Team


